How to Blanch Vegetables for Freezing, Step by Step
Peroxidase is the enzyme that breaks down colour and texture in vegetables during freezing. Boiling water deactivates it, but only if you stop the heat fast enough — at around 90°C, the enzyme stops working. The ice bath is what gets you there.
This matters if you’ve grown too much, bought too much at the market, or you’re batch-cooking ahead. Done properly, blanching locks in colour, flavour and that snap that makes a vegetable worth eating. It does not take long, even for a big pot. This is how to get it right.
The Science of the “Snap”
Vegetables are alive in a quiet way. Even after you’ve cut them, enzymes inside the cells continue working, breaking down texture, dulling flavour, and eventually causing off-notes that people describe as “tasting frozen.” Freezing doesn’t stop this. Put raw, unblanched vegetables in the freezer and the enzymes keep going, just more slowly. Over weeks, the results are exactly what you’d find in that mushy broccoli bag.
Boiling deactivates those enzymes. Heat is what stops the process. But here’s the catch: the moment you drop a floret of cauliflower into boiling water, you’ve also started cooking it. The clock is running on texture from the second the water touches it. A minute too long and the cells have ruptured past the point of recovery. The ice bath is the emergency brake; it drops the temperature so fast that cooking stops, leaving the structure largely intact. Without it, you’re blanching your way to a mushy result before the vegetables ever freeze.
Blanching must be followed by prompt cooling in ice water, cold water, or cold running water. If ice is unavailable, use cold running water and get the vegetables cold as quickly as you can.
Stop the Clock: The Ice Bath Step
This is the step that separates a useful frozen vegetable from a disappointing one, and it’s the one most guides mention in passing or skip entirely. The fix is embarrassingly simple: prepare the ice bath before you put anything in the boiling water.
Fill a large bowl with very cold water and add a generous quantity of ice. It needs to be genuinely cold, not just water from the tap. Use ice water to cool the vegetables rapidly and limit further cooking.
Here’s the order: bring a large pan of water to a rolling boil. Drop your prepared vegetables in. Time from the moment the water returns to a boil. When your timer goes off, fish them out immediately with a slotted spoon or a spider strainer; speed matters here. Drain them briefly, then plunge them straight into the ice bath. Leave them in there until they’re completely cold, then drain again and dry them thoroughly before packing.
What you’ll need:
- A large pot — enough to hold the vegetables comfortably without crowding, which drops the temperature too much
- A slotted spoon or spider strainer — the wide, flat scoop makes it easy to lift everything out fast
- A big bowl of ice and cold water — make this first, before you even light the hob
- A clean tea towel or paper towels for drying
The whole thing is quick from pulling them out of the ice bath to ready-to-freeze. It sounds fussy, but once you’ve done it a couple of times it becomes automatic. The ice bath bowl goes on the side, the strainer (paid link)See on Amazon goes into the pot, the timer is running. Sorted.
The “Good Enough” Blanching Guide
Timings are guides, not laws. A thin French bean and a thick chunk of carrot from the same bag don’t take the same time. A young, tender courgette is nothing like a denser, older one. Most home cooks find the sweet spot by starting at the short end of the time and tasting one piece before committing to the batch.
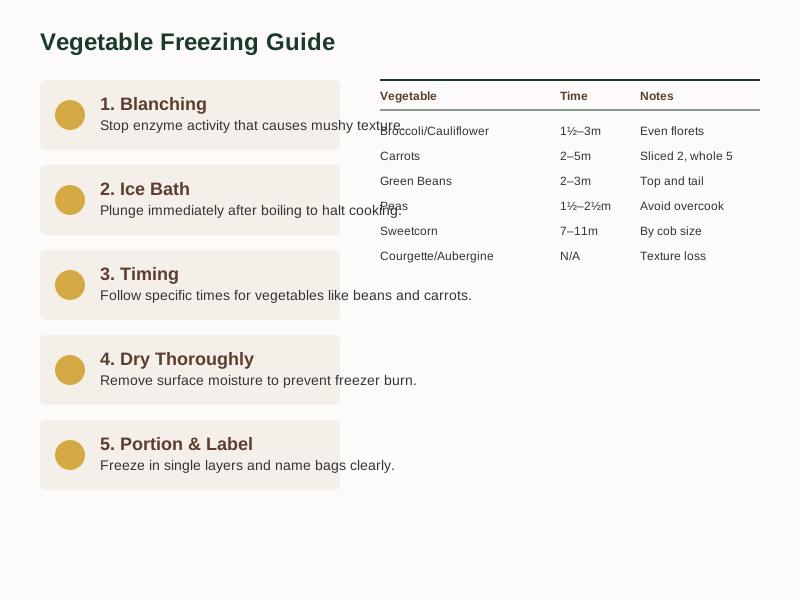
Use the times in the table below, and these notes on preparation:
- Broccoli and cauliflower: Cut into even-sized florets; if some pieces are twice the size of others, the small ones will overcook while the big ones are still underdone.
- Carrots: Older, denser carrots need longer than young, tender ones. Slice uniformly or they’ll cook unevenly.
- Green beans: Top and tail first; the fibrous ends don’t soften nicely.
- Peas: This is a fast one; overcook them and you get starchy, flat-tasting mush.
Some high-water vegetables have poorer frozen texture, but eggplant can be blanched using an appropriate tested method. Courgette and most salad vegetables are not worth the effort of blanching. They have a very high water content and their texture degrades badly in the freezer regardless of what you do to them. Use them fresh or cook them first and freeze the finished dish instead.
If you’re cooking the vegetables as part of a soup that will be cooked again when you reheat from frozen, blanching beforehand is optional. The soup cooking does the job. Blanching may help preserve colour and texture when those qualities matter. If you’ve bought a bag of frozen peas and want to blanch them before adding to a dish, it’s fine as a technique, but you’re working with already-compromised texture so manage your expectations.
Sweetcorn on the cob is worth mentioning: blanch whole cobs for the time in the table below, then slice or cut the kernels off once cooled. It works well for soup and braised dishes; it won’t taste the same as sweetcorn straight off the cob, but it’ll do a decent job in a chowder or a fritter.
Packing for the Freezer
Blanching is only half the job. How you pack the vegetables determines whether they come back usable or not.
The biggest mistake is not drying them properly. Any moisture on the surface turns to ice crystals, which means freezer burn, discolouration and a texture that’s dry and cardboard-like in patches. After the ice bath, spread the vegetables on a clean tea towel or a layer of paper towels and pat them dry. Don’t rush this step.
Portion before you freeze. Freeze vegetables in usable portions to avoid repeatedly thawing and refreezing leftovers. Instead, spread the blanched, dried vegetables on a tray in a single layer and open-freeze them until solid (an hour or two), then transfer to a freezer bag. That way they stay loose and you can pour out exactly what you need without hacking at a frozen brick.
Press as much air out of the bag as you can before sealing. Air exposure is what drives freezer burn. A zip-seal bag where you’ve run your thumb along the seal and pushed the air out before closing is adequate for most home purposes. Lakeland Zip-Seal bags, 18×20 cm, pack of 24 are thick and the zip seal is easy to reopen and close; useful if you’re dipping into the same bag regularly. The cheap basics work fine too for one-time portions.
Label every bag. Name and date, at minimum. Frozen vegetables look remarkably similar once they’re solid; a bag of peas and a bag of broad beans are near-impossible to tell apart in a dark freezer drawer. A pen and a freezer label (paid link)See on Amazon costs almost nothing and it’s the difference between a useful freezer and a mystery box a few months on.
Now you know what to look for — Download the Free Freezer Labelling and Portioning Checklist to make sure nothing slips through the net.
Blanching Timings for Common Vegetables
These are boiling-water times, from Penn State Extension’s freezing guide unless the row says otherwise.
| Vegetable | Blanching Time | Notes |
|---|---|---|
| Broccoli | 3 minutes | Cut into even-sized florets; more on florets here |
| Cauliflower | 90 seconds to 3 minutes | UK charity Love Food Hate Waste says 90 seconds, US extension guides 3 |
| Carrots | 2 minutes sliced or diced, 5 minutes whole | Older carrots need longer |
| Green Beans | 2 minutes small, 3 minutes large | Top and tail first |
| Peas | 1½ minutes small, 2½ minutes large | Fast cook; avoid overcooking |
| Sweetcorn (whole cob) | 7 minutes small, 9 medium, 11 large | Slice after cooling |
| Courgette, Aubergine | Not recommended | High water content, texture degrades |
📺 Watch: How to Blanch Vegetables to Freeze
Taking the Next Step
Blanching is one of those jobs that sounds more complicated than it is. Once you have the ice bath sorted before you start and you’re using a timer, the return is real: a freezer full of vegetables that actually taste like vegetables when you come to use them in winter.
The part that catches people out isn’t the blanching itself; it’s the labelling. Some months down the line, a bag of “stuff” in the freezer drawer helps no one. Grab our free Freezer Labelling and Portioning Checklist and you’ve got a simple system that takes the thinking out of it. Write the name, the date, the portion size; sorted.
Related Guides
For a complete overview, see our Freezing Vegetables, Fruit and Herbs: What Goes Soft and What Holds Up .
Sources & Further Reading
Note: General guidance only, verify details with a qualified professional or official source.