How to Thaw Frozen Bread Without Getting Soggy
As an Amazon Associate we earn from qualifying purchases. Some links on this page are affiliate links, which means we may earn a small commission if you make a purchase.
The first quality lost when bread thaws is crust texture. That crisp, crackling bite that makes a loaf special turns soft and papery if the thawing method doesn’t protect it. The goal is to get the crust back to something close to its original state.
This guide covers how packaging choices create condensation problems, which thawing technique works best for different needs, and the simple step most people overlook.
How Packaging Affects Thawing Results
The issue starts when frozen bread warms up inside a sealed container. Moisture in the air inside the bag condenses on the cold loaf. Trapped against the crust, this water soaks in, turning what should be crisp into something limp. The inside of the bread might be fine, but the crust becomes a disappointment.
This is the critical detail often missed. Removing the bread from its bag, wrapper, or box before thawing allows moisture to evaporate into the air. Leave it sealed, and you’re essentially steaming the crust from the inside. Doing this can help produce a crisper crust compared to leaving it wrapped.
Think of a cold can on a warm day. The condensation on the outside comes from the air. Put it in a cosy and the water pools instead of evaporating. Your bread behaves similarly.
The key adjustment: Take the bread out of any sealed packaging before it thaws. If you need to cover it loosely, use a tea towel or leave the bag open to allow air movement. Freezer bags are great for storage, but they’re the wrong tool for the thaw itself.
Once the loaf is unpackaged, you can assess its condition. If it looks good, slices can go straight into the toaster. If the whole thing needs reviving, the oven is the next step. Loose packaging gives you options.
Signs of freezer burn on bread include dry, discoloured patches that can feel cardboard-like when chewed. If you see this, the texture has suffered damage a simple thaw won’t fix. A hot oven may improve its texture enough for cooked uses like casseroles, even if it won’t be like a fresh bake.
Toasting Slices Straight from the Freezer
For one or two slices, the toaster (paid link)See on Amazon is the quickest and most reliable option. There’s no need to thaw first; just put the frozen slice in and add a bit more time than usual.
Toasting generally produces a drier, crisper surface than microwaving because it drives moisture outwards. The crust crisps up while the inside softens. Toasting from frozen is a straightforward way to avoid waste and get a decent result.
The main adjustment is the timing. Frozen bread is colder and denser, so a setting that toasts a fresh slice might not be enough. Start at a medium-high setting, watch the first piece, and adjust. Getting it right means the result can be close enough for everyday use.
This approach works best for pre-sliced bread, where the slice is thin enough for even heating. Thicker cuts like sourdough batons or focaccia need the oven.
A toaster requires no preheating and minimal cleanup, making it the least fussy option for reviving frozen slices.
Reviving a Whole Loaf in the Oven
When you need an entire loaf—for a family meal or guests—the oven delivers the best results. Done correctly, it yields bread with a crackling crust and a soft, springy interior. The process is simple, but attention to detail matters.
Set your oven to around 163°C (325°F). This temperature is warm enough to soften the crumb without burning the outside. Place the loaf directly on the oven rack or a baking sheet. A published guide suggests 20 to 30 minutes for a whole loaf. For half-loaves or thick slices, check after 10 to 15 minutes.
The dry heat warms the centre while drying the surface, which is why the crust ends up crisp. It’s the opposite of the steamed effect from a sealed bag and consistently works better for whole loaves than other methods.
For an extra-crisp crust, you can lightly mist the surface with water just before putting it in the oven. Love Food Hate Waste recommends this step to help the crust develop a better finish. Do this immediately before heating, not in advance, to avoid re-introducing moisture problems.
A baking sheet catches crumbs, but the oven rack allows heat to circulate evenly. Avoid a loaf tin or covered dish, as trapped steam will soften the crust.
This method is ideal when you need the bread to be a centrepiece. The 20 to 30 minutes is an investment, but the result is worth it.
The Problem with Microwaving Bread
The microwave is fast—heating a slice in short intervals. If speed is the only priority and texture doesn’t matter, it works. For most situations, however, it’s not the best choice.
📺 Watch: How to Thaw Frozen Bread
Microwaving can heat bread unevenly and leave it soft or rubbery. The crust often stays pale and limp. You also risk cold spots in the centre. For bread that has already been frozen, adding a rubbery texture is a further downgrade.
Portioning is another practical limitation. You can typically only do one or two slices at a time, requiring careful monitoring. For a household that uses several slices at once, this is less efficient than using a toaster.
Consider the microwave a last resort—when the toaster is busy and the oven is in use, and you need bread immediately. Otherwise, opt for dry heat.
Common Thawing Questions
Can you refreeze bread after thawing?
Refreezing costs quality, and the Food Standards Agency guidance linked below covers the safety side. If you’ve thawed a loaf you can’t finish, it’s better to toast the remaining slices, which resets the texture, rather than refreezing them.
Should I slice bread before freezing it?
Yes, this is the most useful preparation step. Sliced bread thaws more quickly, lets you take only what you need, and allows toasting straight from the freezer. If freezing a whole loaf, at least cut it in half first.
Do I need a vacuum sealer for bread?
Probably not. A standard freezer bag with the air pressed out works perfectly well. Vacuum sealing is better suited to foods more prone to freezer burn or for very long storage. Bread doesn’t require that level of protection, and the cost of vacuum bags adds up.
What does freezer burn look like on bread?
Dry or discoloured patches on the crust or crumb may indicate freezer burn, giving a cardboard-like texture when eaten. These areas won’t return to their original quality. A hot oven might make it usable in cooked dishes, but prevention through better packing is the real solution.
Comparing Thawing Techniques
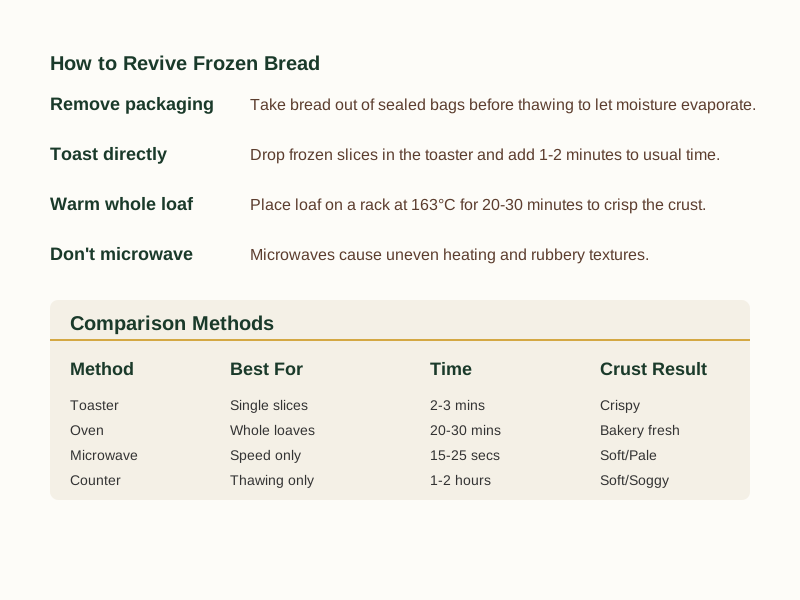
| Method | Best For | Time | Crust Result |
|---|---|---|---|
| Toaster | Single slices | Varies by toaster and slice thickness | Crispy |
| Oven | Whole loaves | 20-30 mins | Crisp exterior, warmed centre |
| Microwave | Speed only | Short intervals; check frequently | Soft/Pale |
| Counter | Thawing only | Overnight; texture varies | Soft/Soggy |
Putting It All Together
The freezer is excellent for preserving bread, but the thaw is a crucial part of the process. Unpack the bread, use dry heat, and you’ll get a much better crust.
Toasting slices is faster than countertop thawing; whole-loaf timing varies. Keep these two methods in mind: toaster for slices, oven for loaves.
If you freeze bread regularly, labelling your bags with the date is helpful. A roll of 1,000 freezer labels, 1×2 in (paid link) and a pen is an inexpensive way to stay organised.
View Freezer Labels on Amazon → (paid link)
Now you know what to look for—Download the Free Freezer Labelling and Portioning Checklist to make sure nothing goes to waste.
If a thawed loaf has softened more than you’d like, treat it as toast bread rather than expecting it to perform like a fresh bakery loaf. For guidance on other baked goods that thaw unevenly, like pastries or cakes, visit our Freezing Dairy, Eggs and Baking hub .
If the next loaf isn’t in the freezer yet, How to Freeze Bread and Get It Back Tasting Fresh covers the wrapping.
Sources & Further Reading
As an Amazon Associate we earn from qualifying purchases. The products linked above are ones we think are worth a look.
Note: General guidance only, verify details with a qualified professional or official source.